Help! I need to replace the lights on my yard sculpture.
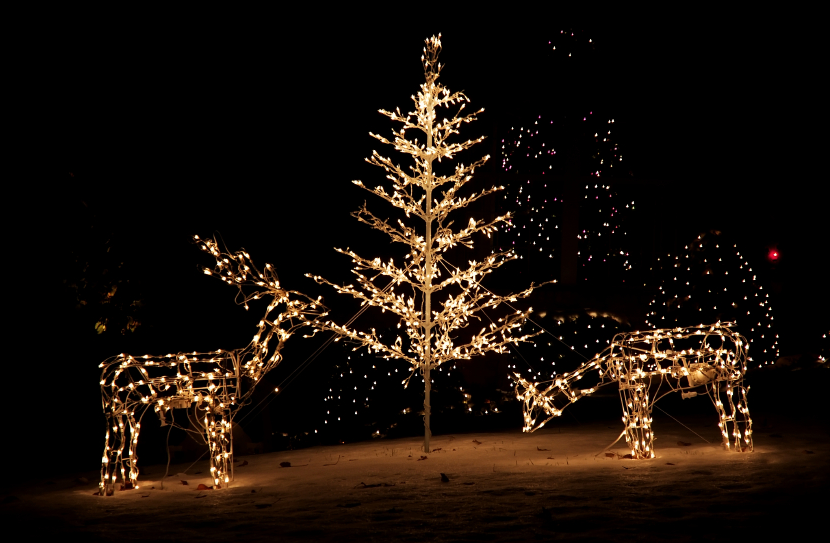
Customers call us every week asking about how to repair or replace the lights on their Christmas 3D graphic yard sculptures.
Hints and Troubleshooting Tips
- If you have the replacement bulbs that came with your yard art, use them to replace any bulbs that might have become unseated during storage. Visually check to see if any bulbs have become even partly unseated. While mini lights will stay lit if one bulb burns out, the circuit will be broken if a light has fallen out.
- For any lights strings that are completely out, check the fuses for each set. An overload or energy surge may have blown them. Usually, there is a little door in each male plug. Slide it back and confirm that the fuses are intact. If the fuse is good, a little wire will be running from the top to the bottom of the fuse. If one of the little filaments is broken, change out the fuse. If that solves your problem, you’re in business.
- Examine the wiring of your lights. If you see wear or exposed copper, remove that set and re-test the remaining sets to see if they are functional. Never plug in a set of lights if you see any type of degradation in your light’s electrical wiring.
If the reason for the light failure isn’t obvious, don’t remove and reinsert bulbs. You’ll only end up with sore fingers and possibly make problems worse. If none of the measures above solve your problem, it may be time to consider replacing your lights.
Guidelines and tips for replacing the lights
- First, determine the size of your. You can confirm the size of your frame by either measuring a clip that was used to install the old lights or by measuring the frame. An easy way to get an accurate measurement is to snug down an adjustable wrench on to the frame then measure the width of the opening.
- Choosing replacement lights
- Don’t remove and throw away the broken lights on. your yard art until you’ve counted how many bulbs are on the frame, about how many strings were used, and their placement. We like to leave the strings in place and remove them as we are installing the new sets so the original installation pattern can be followed.
- Choose a closer spacing between the bulbs to sharpen the outline of your yard art. White wiring is a great choice, especially with white frames, but if the perfect light string for your project is on green wire, while it might be visible during the day, it won’t matter at night.
- Using sculpture clips will make installing the new lights easier but is only an option with standard sized frames. (ie. 1/4″, 3/16″). After a few seasons in the sun, most plastic clips have lost their ability to snug firmly to the frame and will need to be replaced. Purchase one sculpture clip per bulb. Sculpture clips are designed to work with traditional incandescent mini lights bulbs. If you decide to replace your strings with LED lights, confirm that the bases are a similar size. (Some LED mini light strings are made with “larger than traditional” bases.
For non-standard-diameter frames
If your frame is non-standard, an alternative for installation is zip ties. This isn’t a perfect option but after you get into a rhythm, it works. Be sure to allow for a good deal of time and use a stool or you’ll end up with a sore back.
See our blog post about our non-standard rebar Texas frame and how we rewired it with LED lights and zip ties.